I have previously done a review of the TEC accessories glow fob. A GITD pellet is contained with in this glow fob. I prefer tritium which constantly glows and does not need to be 'charged up' with light. Tec accessories sells a glow fob pellet kit, for replacing the stock GITD pellet with something else.
I did a post here on how to temporarily install a tritium vial into one of these empty glow pellets. This solution has been working reasonably well, but I've decided to glue the tritium in permanently with some norland 61. Having tried green, blue and yellow tritium, I've decided to go with green as it is definitely the most brightest and most noticeable out of all the colours.
Here is a video on my technique for installing the tritium into these empty glow pellet tubes. I do admit my technique could do with a bit of refinement... cleaning up the blu-tack is bit of a pain.
Just to recap, here is where I get my stuff from:
-The 3x23mm tritium is from:
http://www.cpfmarketplace.com/mp/showthread.php?170374-For-Sale-Tritium-Vials
-The TEC Accessories Glow Pellet Kit from:
http://www.tecaccessories.com/products/product.php?II=33
-Norland 61:
http://www.cpfmarketplace.com/mp/showthread.php?232854-Norland-61-Optical-Adhesive-for-Trit-installation
Summary of tips to install the tritium:
-Use a bit of blu-tack to block off one end of the empty vial
-You can use a flat end of a toothpick (or similar device) to neaten up the blu-tack if you have pushed it in too far
-Hold the empty vial at an angle, flow the Norland 61 slowly from one side. Let gravity slowly flow the liquid down to the end of the vial. This helps to avoid trapping dead air at the end of the vial.
-Only fill the tube about 1/3 of the way
-Gently insert the 23x3mm tritium. The Norland 61 will flow up the vial as you push it in.
-Leave it upright in bright sunlight or use a UV light to set the Norland 61
-Clean up the blu-tack. Use other larger bits of blu-tack to help pull it out. You can use a toothpick or a small brush to help remove the residual blu-tack
-Top up the rest of the tube with Norland 61, set it again in UV light or sunlight.
Here is link to a PDF made by TEC accessories on various methods of using the glow pellet kit:
http://www.tecaccessories.com/PDF/TA_DIY_Kit_Trit_Project.pdf
Sunday, July 24, 2011

Tuesday, July 5, 2011
18650 BATTERY COMPARISON
18650 BATTERY COMPARISON
Review of Protected Soshine 2800mah 18650 and Protected Trustfire 2400mah 18650
BACKGROUND
The Ultrafire WF504B which was reviewed earlier, uses a 18650 battery. I also plan on posting up reviews of some other 18650 flashlights in future, so I thought it would be a good to do an article on these batteries.
For those of you not familiar with the term, '18650' refers to a lithium ion battery size. In theory the battery should measure 18mmx65mm and be cylindrical (I believe the '0' at the end of '18650' is a reference to the shape). You will often find there is some variation in the actual size of 18650 batteries. Some 18650 have a protection circuit which will add further length. Labels and packaging can also affect the size.
18650 batteries are most commonly found inside laptop battery packs, but they have also been taken up by the flashlight community for powering flashlights. The benefit of these batteries are they can be very energy dense... they can hold alot of energy for it's size.
Before using lithium-ion (li-ion) batteries, it is important to familiarise yourself with the different sorts of li-ion batteries, how to use them safely and how to prolong the life of the batteries. If care is not taken, some types of li-ion batteries can vent and explode! At the end of this post, I've included a few articles and threads with further info on li-ion batteries.
I received a couple of different 18650 batteries from Dealextreme for review. Included were the protected Soshine 2800mah and protected Trustfire 2400mah (black/red/flames packaging).
I was interested to compare these to some other 18650 batteries I have, including the same Trustfire 2400mah, but older and heavily used.
PACKAGING
The packaging for the Protected 2400mah Trustfire batteries is quite rudimentary. They come in a two pack with shrink wrap around the outside.

The packaging for the Protected 2800mah Soshine batteries are more professional. They come in a two pack in a clamshell packaging. A bonus battery case is included.

TESTING METHODOLOGY
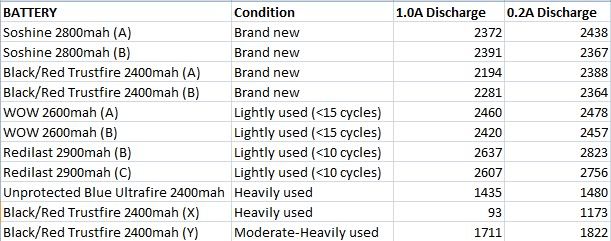
These batteries were all initially charged on a Pila IBC charger using the same channel on the charger. They were then discharged on an Accucell 6 charger at different discharge rates (0.2A and 1.0A). The Accucell 6 discharges the cell until they reach 3.0V (under load). You should note some batteries such as the panasonic NCR18650 and NCR18650a can be discharged down to 2.5V. Since the Accucell terminates at 3.0V, in theory these types of batteries can still be discharged slightly further and provide more capacity. The redilast 2900mah are based on the panasonic ncr18650.
I have included a rough estimate on how heavily used the various batteries are.
I have to say the older batteries have seen some significant use and moderate abuse. The unprotected blue 2400mah ultrafire and protected 2400mah trustfire (X), have seen quite a few cycles, some of which they were deeply discharged. The more heavily used trustfire (X) and was then used with trustfire (Y) in a 2x18650 flashlight (only for a few cyles). Trustfire (Y) had not been as heavily used as trustfire (X). Do note; it is NOT recommended to use two poorly matched batteries in a multi-cell light. I feel this incorrect use of these two batteries, may have result in some damage to both the trustfire cells.
RESULTS


CONCLUSIONS
Under lower current draw (0.2A) conditions the Black/red/flames Trustfire do provide close to the advertised capacity. Under 1A current draw they still provide around 2200mah or more. There is some doubt on how well these batteries keep that capacity after many cycles. My older black/red/flames trustfire have lost a significant amount of capacity, with one developing high internal resistance. I do have to say these older batteries have been through some abuse.
For under $10 for two (shipped), they do represent a good buy, if you accept they may not last as long. (It would be interesting to test my redilast 2900mah after they have been through a similar about of cycles and abuse, to see if these more expensive cells do indeed last longer.) You should also note some people report there to be variation between various batches of these same batteries.
In my samples of the soshine 2800mah batteries, they are quite short of their rated capacity. In my tests I only get around 2400mah from these cells. I have a feeling I have gotten an older batch. After charging the batteries to 4.20V, they do drop down to 4.13V after resting for a period. This is a significant drop in voltage and may indicate they are older or used batteries. Considering the soshine 2800mah are more expensive than the trustfire 2400mah, I feel I can not recommend these batteries. There are better buys elsewhere.
LINKS:
Here a few articles on 18650 batteries
http://batteryuniversity.com/learn/article/lithium_ion_safety_concerns
http://batteryuniversity.com/learn/article/how_to_prolong_lithium_based_batteries
http://batteryuniversity.com/learn/article/lithium_based_batteries
http://www.candlepowerforums.com/vb/showthread.php?312835-Beyond-the-basics-for-Li-ion-safety
http://www.candlepowerforums.com/vb/showthread.php?178133-Are-Li-Ion-Batteries-really-dangerous
http://www.candlepowerforums.com/vb/showthread.php?35282-Li-Ion-FAQ-amp-Safety
http://www.redilast.com/index.php?option=com_content&view=article&id=51&Itemid=85
http://budgetlightforum.com/node/1825
Links for buying the protected soshine 2800mah and protected Trustfire 2400mah:
http://www.dealextreme.com/p/soshine-protected-18650-3-7v-2800mah-lithium-batteries-with-case-black-2-battry-pack-31896
http://www.dealextreme.com/p/trustfire-protected-18650-3-7v-true-2400mah-rechargeable-lithium-batteries-2-pack-20392
Review of Protected Soshine 2800mah 18650 and Protected Trustfire 2400mah 18650
BACKGROUND
The Ultrafire WF504B which was reviewed earlier, uses a 18650 battery. I also plan on posting up reviews of some other 18650 flashlights in future, so I thought it would be a good to do an article on these batteries.
For those of you not familiar with the term, '18650' refers to a lithium ion battery size. In theory the battery should measure 18mmx65mm and be cylindrical (I believe the '0' at the end of '18650' is a reference to the shape). You will often find there is some variation in the actual size of 18650 batteries. Some 18650 have a protection circuit which will add further length. Labels and packaging can also affect the size.
18650 batteries are most commonly found inside laptop battery packs, but they have also been taken up by the flashlight community for powering flashlights. The benefit of these batteries are they can be very energy dense... they can hold alot of energy for it's size.
Before using lithium-ion (li-ion) batteries, it is important to familiarise yourself with the different sorts of li-ion batteries, how to use them safely and how to prolong the life of the batteries. If care is not taken, some types of li-ion batteries can vent and explode! At the end of this post, I've included a few articles and threads with further info on li-ion batteries.
I received a couple of different 18650 batteries from Dealextreme for review. Included were the protected Soshine 2800mah and protected Trustfire 2400mah (black/red/flames packaging).
I was interested to compare these to some other 18650 batteries I have, including the same Trustfire 2400mah, but older and heavily used.
PACKAGING
The packaging for the Protected 2400mah Trustfire batteries is quite rudimentary. They come in a two pack with shrink wrap around the outside.

The packaging for the Protected 2800mah Soshine batteries are more professional. They come in a two pack in a clamshell packaging. A bonus battery case is included.

TESTING METHODOLOGY
These batteries were all initially charged on a Pila IBC charger using the same channel on the charger. They were then discharged on an Accucell 6 charger at different discharge rates (0.2A and 1.0A). The Accucell 6 discharges the cell until they reach 3.0V (under load). You should note some batteries such as the panasonic NCR18650 and NCR18650a can be discharged down to 2.5V. Since the Accucell terminates at 3.0V, in theory these types of batteries can still be discharged slightly further and provide more capacity. The redilast 2900mah are based on the panasonic ncr18650.
I have included a rough estimate on how heavily used the various batteries are.
I have to say the older batteries have seen some significant use and moderate abuse. The unprotected blue 2400mah ultrafire and protected 2400mah trustfire (X), have seen quite a few cycles, some of which they were deeply discharged. The more heavily used trustfire (X) and was then used with trustfire (Y) in a 2x18650 flashlight (only for a few cyles). Trustfire (Y) had not been as heavily used as trustfire (X). Do note; it is NOT recommended to use two poorly matched batteries in a multi-cell light. I feel this incorrect use of these two batteries, may have result in some damage to both the trustfire cells.
RESULTS


CONCLUSIONS
Under lower current draw (0.2A) conditions the Black/red/flames Trustfire do provide close to the advertised capacity. Under 1A current draw they still provide around 2200mah or more. There is some doubt on how well these batteries keep that capacity after many cycles. My older black/red/flames trustfire have lost a significant amount of capacity, with one developing high internal resistance. I do have to say these older batteries have been through some abuse.
For under $10 for two (shipped), they do represent a good buy, if you accept they may not last as long. (It would be interesting to test my redilast 2900mah after they have been through a similar about of cycles and abuse, to see if these more expensive cells do indeed last longer.) You should also note some people report there to be variation between various batches of these same batteries.
In my samples of the soshine 2800mah batteries, they are quite short of their rated capacity. In my tests I only get around 2400mah from these cells. I have a feeling I have gotten an older batch. After charging the batteries to 4.20V, they do drop down to 4.13V after resting for a period. This is a significant drop in voltage and may indicate they are older or used batteries. Considering the soshine 2800mah are more expensive than the trustfire 2400mah, I feel I can not recommend these batteries. There are better buys elsewhere.
LINKS:
Here a few articles on 18650 batteries
http://batteryuniversity.com/learn/article/lithium_ion_safety_concerns
http://batteryuniversity.com/learn/article/how_to_prolong_lithium_based_batteries
http://batteryuniversity.com/learn/article/lithium_based_batteries
http://www.candlepowerforums.com/vb/showthread.php?312835-Beyond-the-basics-for-Li-ion-safety
http://www.candlepowerforums.com/vb/showthread.php?178133-Are-Li-Ion-Batteries-really-dangerous
http://www.candlepowerforums.com/vb/showthread.php?35282-Li-Ion-FAQ-amp-Safety
http://www.redilast.com/index.php?option=com_content&view=article&id=51&Itemid=85
http://budgetlightforum.com/node/1825
Links for buying the protected soshine 2800mah and protected Trustfire 2400mah:
http://www.dealextreme.com/p/soshine-protected-18650-3-7v-2800mah-lithium-batteries-with-case-black-2-battry-pack-31896
http://www.dealextreme.com/p/trustfire-protected-18650-3-7v-true-2400mah-rechargeable-lithium-batteries-2-pack-20392
Friday, June 10, 2011
Egear Pico Zipper Lite VS Streamlight Nano Comparison
Egear Pico Zipper Lite VS Streamlight Nano Comparison

Having reviewed the streamlight nano, I was keen to see how it compared to the egear pico zipper lite. Both these flashlights are quite similar and I would consider them to be direct competitors to each other. They both run on 4xLR41 batteries and are comparable in size.
BUILD AND CONSTRUCTION
The egear pico zipper lite has a slightly wider battery tube than the streamlight nano. However, in practice, I find this difference in size is barely noticeable.
One of the reasons why the pico lite has a wider battery tube is because it also has a 'battery carrier' inside. This carrier makes it easier to load the batteries into the flashlight, when compared to the streamlight nano.
I have not come across many complaints of the egear pico zipper lite coming apart, though I wouldn't completely rule it out from happening. I have noticed in the past, people having well made AAA lights like the fenix LD01 come apart, despite having good threads and o-rings. Generally for keychain flashlights, I recommend adding a small swivel to minimise the chances accidental twisting. I haven't had my own streamlight nano come apart, but in general there do seem to be more complaints of the streamlight nano untwisting apart when compared to the egear pico lite.
I do notice in the design of the egear pico zipper lite, the head of the of the flashlight is partially recessed into the battery tube. There is about 3mm of the head available for turning the light on and off. This leaves less area exposed to accidental twisting forces. This maybe one of the reasons why there are less reports of the pico lite untwisting apart.

Being so small, both of these keychain/zipper flashlights are harder to operate one handed. The streamlight nano has a longer head to twist with, but a smaller body which is harder to grip. The egear zipper lite is the opposite, it has a smaller head but a longer body which is easier to grip. The egear pico lite has knurling on the head, which does make it easier to twist the head. Between the two flashlights, I find the pico lite slightly easier to use one-handed, YMMV.
I find there is less 'thread play' in the egear pico lite compared to the streamlight nano. More pronounced thread play means you need to unscrew the flashlight slightly further, to ensure it is properly off. If you do not untwist it enough, the light can still turn on if pressure is applied to the head of the flashlight.
The streamlight nano generally comes in black. There are special blue and pink editions available, but I do not know if these will remain available permanently. The egear pico zipper lites come in 5 colours: blue, red, green, black and grey/titanium.
I haven't paid attention to the how quickly the annodisation has worn away on the streamlight nano, as it usually on my wife's keychain. I have not the the egear pico lite for very long, but I have noticed it has worn quite quickly. After a month or two of mild usage there is already wear on the knurling and corners of the flashlight.
BEAM, OUTPUT AND RUNTIME
According to the specifications of these light, they are meant to produce a similar amount of output (~10 lumens). This is in line with what we expect from a 5mm LED.

I prefer the beam in the egear pico lite when compared to the streamlight nano. In my sample the pico lite has less noticeable rings and artefacts in the beam. The pink streamlight nano that I have, has a more pronounce pinky-purple tint. The pico lite still has a purplish tint, but less so than the streamlight nano. Keep in mind these are just individual samples, there can sometimes be variation in tint within the same flashlight line.
Streamlight list the runtime of the nano to be 8 hours of 'usable' output. The egear pico zipper lite claims to have a runtime of 15 hours. I am surprised about the amount of difference between the runtimes of these two lights. Considering they both used 5mm LEDs, the same batteries and are direct driven... I would have expected them to be similar. Unfortunately I do not have any spare LR41 batteries to test out the claimed runtimes (donations welcome), but here a few theories I have come up with to explain the discrepancies:
(a) Different runtime measurement techniques. Over-estimating or under-estimating of the runtimes. Perhaps Streamlight list the amount of 'usuable' output; after 8 hours there may still be some very very dim ouput. Perhaps Egear measure the runtime until the flashlight has absolutely no output?
(b) The pico zipper lite has a resistor, which reduces the current to the LED... resulting in a slightly less bright flashlight, but longer runtimes?
(c) I always thought both these flashlights use the same nichia GS LED, however seeing the difference in beam characteristics, the egear pico lite may use another 5mm LED? Perhaps this other 5mm LED may be more efficient? But some how I doubt the efficiency would be twice that of LED in the streamlight nano.
Out of these theories, I suspect (a) to be the most likely scenario. Manufacturers play all sorts of games to advertise longer runtimes or brighter outputs. If you have any information on the runtime discrepancies, please leave a comment.

CONCLUSIONS
By now you'll probably figure I prefer the egear pico lite over the streamlight nano. This is certainly the case. Lets look at a summary of the pro's:
-easier to load the batteries
-less reports of it coming apart
-less thread play
-slightly easier to operate one handed
-nicer beam and tint (at least in my samples)
-potentially longer run-time (yet to be verified)
-available in more colours (but not pink)

Given a choice I would prefer to buy the pico lite over the streamlight nano, and you can see why. Price wise they are pretty comparable, looking at amazon.com they can both be bought for under $10.
Credit where it is due, I believe the streamlight nano has been around for longer. To me, it seems as if Egear has taken the concept of the streamlight nano, and slightly redesigned it to address some of the original short-comings.
LINKS
Streamlight nano manufacturers website
Egear pico zipper lite website
Pink streamlight nano review
ADDITIONAL PHOTOS




BUILD AND CONSTRUCTION
The egear pico zipper lite has a slightly wider battery tube than the streamlight nano. However, in practice, I find this difference in size is barely noticeable.
 |
| Size Comparison: Steve Ku 38DD, streamlight nano, egear pico zipper lite, modamag drake |
One of the reasons why the pico lite has a wider battery tube is because it also has a 'battery carrier' inside. This carrier makes it easier to load the batteries into the flashlight, when compared to the streamlight nano.
 |
| Battery carrier in the Egear pico zipper lite |
I have not come across many complaints of the egear pico zipper lite coming apart, though I wouldn't completely rule it out from happening. I have noticed in the past, people having well made AAA lights like the fenix LD01 come apart, despite having good threads and o-rings. Generally for keychain flashlights, I recommend adding a small swivel to minimise the chances accidental twisting. I haven't had my own streamlight nano come apart, but in general there do seem to be more complaints of the streamlight nano untwisting apart when compared to the egear pico lite.
I do notice in the design of the egear pico zipper lite, the head of the of the flashlight is partially recessed into the battery tube. There is about 3mm of the head available for turning the light on and off. This leaves less area exposed to accidental twisting forces. This maybe one of the reasons why there are less reports of the pico lite untwisting apart.
 |
| Only the knurled section of the head is exposed, the rest of it is recessed into the body |

Being so small, both of these keychain/zipper flashlights are harder to operate one handed. The streamlight nano has a longer head to twist with, but a smaller body which is harder to grip. The egear zipper lite is the opposite, it has a smaller head but a longer body which is easier to grip. The egear pico lite has knurling on the head, which does make it easier to twist the head. Between the two flashlights, I find the pico lite slightly easier to use one-handed, YMMV.
 |
| Streamlight nano, Egear pico zipper lite [the wider longer body makes the pico lite easier to operate one handed, knurling adds grip when twisting the head] |
The streamlight nano generally comes in black. There are special blue and pink editions available, but I do not know if these will remain available permanently. The egear pico zipper lites come in 5 colours: blue, red, green, black and grey/titanium.
 |
| (Picture sourced from the Egear website) |
I haven't paid attention to the how quickly the annodisation has worn away on the streamlight nano, as it usually on my wife's keychain. I have not the the egear pico lite for very long, but I have noticed it has worn quite quickly. After a month or two of mild usage there is already wear on the knurling and corners of the flashlight.
BEAM, OUTPUT AND RUNTIME
According to the specifications of these light, they are meant to produce a similar amount of output (~10 lumens). This is in line with what we expect from a 5mm LED.

I prefer the beam in the egear pico lite when compared to the streamlight nano. In my sample the pico lite has less noticeable rings and artefacts in the beam. The pink streamlight nano that I have, has a more pronounce pinky-purple tint. The pico lite still has a purplish tint, but less so than the streamlight nano. Keep in mind these are just individual samples, there can sometimes be variation in tint within the same flashlight line.
 |
| Beamshot of streamlight nano from ~1m |
 |
| Beamshot of Egear pico zipper lite from ~1m |
Streamlight list the runtime of the nano to be 8 hours of 'usable' output. The egear pico zipper lite claims to have a runtime of 15 hours. I am surprised about the amount of difference between the runtimes of these two lights. Considering they both used 5mm LEDs, the same batteries and are direct driven... I would have expected them to be similar. Unfortunately I do not have any spare LR41 batteries to test out the claimed runtimes (donations welcome), but here a few theories I have come up with to explain the discrepancies:
(a) Different runtime measurement techniques. Over-estimating or under-estimating of the runtimes. Perhaps Streamlight list the amount of 'usuable' output; after 8 hours there may still be some very very dim ouput. Perhaps Egear measure the runtime until the flashlight has absolutely no output?
(b) The pico zipper lite has a resistor, which reduces the current to the LED... resulting in a slightly less bright flashlight, but longer runtimes?
(c) I always thought both these flashlights use the same nichia GS LED, however seeing the difference in beam characteristics, the egear pico lite may use another 5mm LED? Perhaps this other 5mm LED may be more efficient? But some how I doubt the efficiency would be twice that of LED in the streamlight nano.
Out of these theories, I suspect (a) to be the most likely scenario. Manufacturers play all sorts of games to advertise longer runtimes or brighter outputs. If you have any information on the runtime discrepancies, please leave a comment.

CONCLUSIONS
By now you'll probably figure I prefer the egear pico lite over the streamlight nano. This is certainly the case. Lets look at a summary of the pro's:
-easier to load the batteries
-less reports of it coming apart
-less thread play
-slightly easier to operate one handed
-nicer beam and tint (at least in my samples)
-potentially longer run-time (yet to be verified)
-available in more colours (but not pink)

Given a choice I would prefer to buy the pico lite over the streamlight nano, and you can see why. Price wise they are pretty comparable, looking at amazon.com they can both be bought for under $10.
Credit where it is due, I believe the streamlight nano has been around for longer. To me, it seems as if Egear has taken the concept of the streamlight nano, and slightly redesigned it to address some of the original short-comings.
LINKS
Streamlight nano manufacturers website
Egear pico zipper lite website
Pink streamlight nano review
ADDITIONAL PHOTOS


Friday, May 27, 2011
TEMPORARY INSTALLATION OF TRITIUM INTO TEC ACCESSORIES GLOW FOB
TEMPORARY INSTALLATION OF TRITIUM INTO TEC ACCESSORIES GLOW FOB
I've been meaning to change the GITD pellet in the tec accessories glow fob for some time now. However, I was undecided on what colour tritium I wanted to glue into the empty tubes tec accessories sell. I was trying to figure out a way to temporarily install the 23x3mm tritium, but still be able to remove the tritium in case I wanted to use that tritium vial elsewhere.
This is what I came up with.
Materials:
-23x3mm tritium
-'Blu-tack'. Not sure what you call it in other countries but here is the wikipedia entry for it: http://en.wikipedia.org/wiki/Blu-Tack
-Small round circles of plastic cut out from empty battery packaging. The circles should roughly be the diameter of the empty vial.
-Glow pellet kit from tec accessories
Method:
-Place the 23x3mm tritium into the empty acrylic tube from tec accessories
-Centre the tritium vial, place a little blu-tack in either end to keep the tritium in place
-Tack the plastic circles to either end of the acrylic tube
-Remove the o-ring in the tec accessories glow fob, swap the GITD pellet with your tritium pellet.
-Place the o-ring back in, make sure everything is firmly in place and there is minimal movement of the tritium pellet.
The small round plastic circles will hold the blu-tack in place and reduces dirt sticking to the blu-tack. The o-ring and washer should hold the small plastic circles in place and stop them from falling out. If you want to retrieve your tritium vial, it's pretty easy to take the blu-tack back out.
I'll see how this works for me in the medium term. If it works out okay, I might just leave the tritium installed as is. If it doesn't work out well, I'll just install them with norland 61 for a more permanent solution.
OTHER LINKS:
Tec accessories glow fob review
Glow fob pellet kit
Tec accessories glow fob
Merkava 23x3mm tritium sales thread
I've been meaning to change the GITD pellet in the tec accessories glow fob for some time now. However, I was undecided on what colour tritium I wanted to glue into the empty tubes tec accessories sell. I was trying to figure out a way to temporarily install the 23x3mm tritium, but still be able to remove the tritium in case I wanted to use that tritium vial elsewhere.
This is what I came up with.
Materials:
-23x3mm tritium
-'Blu-tack'. Not sure what you call it in other countries but here is the wikipedia entry for it: http://en.wikipedia.org/wiki/Blu-Tack
-Small round circles of plastic cut out from empty battery packaging. The circles should roughly be the diameter of the empty vial.
-Glow pellet kit from tec accessories
Method:
-Place the 23x3mm tritium into the empty acrylic tube from tec accessories
-Centre the tritium vial, place a little blu-tack in either end to keep the tritium in place
-Tack the plastic circles to either end of the acrylic tube
-Remove the o-ring in the tec accessories glow fob, swap the GITD pellet with your tritium pellet.
-Place the o-ring back in, make sure everything is firmly in place and there is minimal movement of the tritium pellet.
The small round plastic circles will hold the blu-tack in place and reduces dirt sticking to the blu-tack. The o-ring and washer should hold the small plastic circles in place and stop them from falling out. If you want to retrieve your tritium vial, it's pretty easy to take the blu-tack back out.
I'll see how this works for me in the medium term. If it works out okay, I might just leave the tritium installed as is. If it doesn't work out well, I'll just install them with norland 61 for a more permanent solution.
 |
| Plastic battery packaging used to cut two round circles on the right |
 |
| Blu-tack |
 |
| Bottom: washer, plastic circle, 23x3mm tritium in acrylic tube with blu-tack on either end, plastic circle, o-ring |
OTHER LINKS:
Tec accessories glow fob review
Glow fob pellet kit
Tec accessories glow fob
Merkava 23x3mm tritium sales thread
Friday, May 20, 2011
Sanrenmu GR5-605 and GV-604 (Review)
SANRENMU GR5-605 and GV-604 (Review)

Living in Australia, the laws on importing and carrying knives can be fairly strict. The general populous would be wary of you, if you were to carry anything too large or threatening. For myself, realistically, living in a middle-class suburban environment, there is not a lot of need for me to EDC a large knife.
As a result of this, I have to say I am not an avid knife collector and in fact have only a basic knowledge on knives. I will do my best to analyse these Sanrenmu knives from a novice's point of view, along with some information I have gleaned from reading various knife forums and websites. No doubt there are some knife enthusiasts who would be able to provide more detailed criticism (feel free to chime in with your comments).
These Sanrenmu knives were provided by EDC depot for review. Included are the Sanrenmu GR5-605 and Sanrenmu GV-604.
PACKAGING AND ACCESSORIES
Both the Sanrenmu GR5-605 and Sanrenmu GV-604 knives come in a small cardboard box. Included is a user guide, that is not specific for these models.
SIZE AND SPECIFICATIONS
Open length: 5.20”/132mm
Closed length: 2.95”/75mm
Blade length: 1.71”/43.5mm
Cost: $5.99
Web Address:
Sanrenmu GV-604: http://edcdepot.com/sanrenmugv-605foldingknife.aspx
Sanrenmu GR5-605: http://edcdepot.com/sanrenmugr5-605foldingknife.aspx
DESIGN AND BUILD
Both the Sanrenmu GR5-605 and GV-604 are similar in size and build. The main differences between the two is the shape of the blade. The GV-604 has a chisel ground tanto blade and the GR5-605 has a drop point blade. The '604' has green handles while the '605' has earthy-red handles.

These small sanrenmu knives have a thumb stud for deployment, however the thumb stud is only one sided, making it more suitable for right handed users. Deploying the knife one handed is possible, but as the knife is so small, it takes a little practice to get used to it. In my samples, the opening action is quite smooth.
For left-handed users; I have tried removing the thumb stud with a hex key and pliers, and swapping the stud to the other side. It is possible, but not ideal. The screw won't be recessed and there is less relief around the thumb stud, making it harder to deploy. If you are a left handed, I would suggest to find a different knife.
These knives have a liner-lock, once opened they are 'locked' into position. To close the blade, you need to push outwards on one of the liners, unlocking the blade. It is possible to close the knife one handed, but once again, it is not easy and takes a little practice.
The prescence of the steel liners help to provide a more balanced feel to the knife, but they also add significant weight (compared to a knife without liners). I would consider this additional weight undesirable if you were going to be using this as a 'keychain' knife.
Both the Sanrenmu GR5-605 and GV-604 include a clip. When clipped to your pocket/belt the blade will be in a 'tip-up' position. This clip is easily removable if you have the right sized hex key.
There is a small hole at the end of the knife for attaching a split ring or a lanyard to.
ERGONOMICS
There are two notches for placement of the fore finger and middle finger. One notch is in the handle and the other notch is where the blade and handle join together. I find my fingers fit comfortably in these grooves and the ergonomics of this knife to be acceptable. An addition I would like to see would be a thumb ramp at the back of the blade. This feature is present in my spyderco ladybug, and I find it useful to have a thumbrest that helps to brace the knife.

TANTO VS DROP POINT
From what I gather with my reading, an 'american tanto' blade is better for piercing and puncturing objects. A drop-point blade has a 'belly' which is good for slicing. Drop-point blades are a more common 'all-rounder' blade format.
Between these two types of blades I prefer the drop point blade (which is present in the Sanrenmu GR5-605). For general usage it just seems easier to handle and use. I find the drop point easier to sharpen as well. Sharpening an american tanto blade requires sharpening the two edges separately.
HANDLE MATERIAL
The scales or handles to these knives are made from G10. G10 scales seem to be more common on expensive knives, so it's nice getting an idea what it feels like on these cheaper knives. I quite like the feel of the textured G10 scales, it provides good grip when wet. I prefer the feel of these handles over my spyderco FRN handles (on the ladybug, stretch and salt). I do have to say though, the handles some how have a slightly cheap and ugly look to them (in my opinion).


STEEL
Both these knives are reported to be made from 8Cr13Mov steel. 8cr13Mov is used in some of the cheaper spyderco and the Byrd range of knives. It is meant to be comparable to AUS8 steel. However there is more to knife steel than the elements contained within. How the knife is tempered and heat treated by the manufacturer will affect it's properties.
SHARPNESS
When I received these out of the box, they were not very sharp. With a bit of work on my spyderco sharpmaker, I got them with a decent edge. I wasn't able to get it sharp enough to push paper or shave hair, but thats more likely due to my average sharpening skills. Even with the sharpmaker, I have trouble getting an ultra-sharp edge on my other knives.
RUSTING
I've used these knives for a couple months now, mainly for cutting and peeling some fruit and veges. I also occasionally use them for opening boxes or packages. I haven't treasured or taken particular care of these knives. Being a lazy grot, I often leave them overnight unwashed after cutting and peeling fruits. I've also washed them with detergent and left them to air dry (instead of wiping them down). I have noticed with time, a few spots of rust developing on the knife due this abuse. Most of these spots were able to be removed with a bit of washing and scrubbing.
CONCLUSION
In some circles this knife has been marketed as being a keychain knife. People will have a different opinion on what constitutes a keychain knife, but in my opinion I feel it is a little too big and heavy. I even find something on the lines of the spyderco ladybug, a little too large for my keychain preferences. Instead I feel the Sanrenmu GV-604 and GR5-605 knives would be better classified as a mini-EDC knife.

From what I gather, the 8Cr13Mov steel seems to offer decent performance at a good price point. Sure there are 'better' steels out there, but these exotic steels will be more expensive as well. These Sanrenmu knives feel comfortable in the hand, come with g-10 scales, have a removable clip... considering the knife costs $6 there's not much to complain about.
Whether you get the GR5-605 or GV-604, depends on personal preference on blade design. As mentioned earlier I prefer the drop point blade on the Sanrenmu '605'.
I feel these sanrenmu knives make good 'beater knives' where you can be rough with it, without worrying about babying the blade. If it breaks or chips, its not a big deal if you need to replace it.
OTHER KNIVES TO CONSIDER
There would be a whole range of knives that you could fit into this mini-EDC/large keychain knife category. Some that I have come across include:
spyderco ladybug - can come in a variety of more expensive steels (e.g. VG10 and H1). Lock-back mechanism
spyderco grasshopper - also 8Cr13Mov steel. Slip joint knife (which I believe is preferred in the UK)
boker plus keycom - has clip in tip-down position. AUS-8 steel

Living in Australia, the laws on importing and carrying knives can be fairly strict. The general populous would be wary of you, if you were to carry anything too large or threatening. For myself, realistically, living in a middle-class suburban environment, there is not a lot of need for me to EDC a large knife.
As a result of this, I have to say I am not an avid knife collector and in fact have only a basic knowledge on knives. I will do my best to analyse these Sanrenmu knives from a novice's point of view, along with some information I have gleaned from reading various knife forums and websites. No doubt there are some knife enthusiasts who would be able to provide more detailed criticism (feel free to chime in with your comments).
These Sanrenmu knives were provided by EDC depot for review. Included are the Sanrenmu GR5-605 and Sanrenmu GV-604.
PACKAGING AND ACCESSORIES
Both the Sanrenmu GR5-605 and Sanrenmu GV-604 knives come in a small cardboard box. Included is a user guide, that is not specific for these models.
 |
| Packaging |
 |
| User guide |
SIZE AND SPECIFICATIONS
Open length: 5.20”/132mm
Closed length: 2.95”/75mm
Blade length: 1.71”/43.5mm
Cost: $5.99
Web Address:
Sanrenmu GV-604: http://edcdepot.com/sanrenmugv-605foldingknife.aspx
Sanrenmu GR5-605: http://edcdepot.com/sanrenmugr5-605foldingknife.aspx
DESIGN AND BUILD
Both the Sanrenmu GR5-605 and GV-604 are similar in size and build. The main differences between the two is the shape of the blade. The GV-604 has a chisel ground tanto blade and the GR5-605 has a drop point blade. The '604' has green handles while the '605' has earthy-red handles.

These small sanrenmu knives have a thumb stud for deployment, however the thumb stud is only one sided, making it more suitable for right handed users. Deploying the knife one handed is possible, but as the knife is so small, it takes a little practice to get used to it. In my samples, the opening action is quite smooth.
 |
| Thumb stud for right-handers |
For left-handed users; I have tried removing the thumb stud with a hex key and pliers, and swapping the stud to the other side. It is possible, but not ideal. The screw won't be recessed and there is less relief around the thumb stud, making it harder to deploy. If you are a left handed, I would suggest to find a different knife.
These knives have a liner-lock, once opened they are 'locked' into position. To close the blade, you need to push outwards on one of the liners, unlocking the blade. It is possible to close the knife one handed, but once again, it is not easy and takes a little practice.
 |
| The bottom steel liner needs to be pushed outwards to close the blade |
Both the Sanrenmu GR5-605 and GV-604 include a clip. When clipped to your pocket/belt the blade will be in a 'tip-up' position. This clip is easily removable if you have the right sized hex key.
 |
| Clip removed from the knife. Lanyard hole (larger bottom-most hole) |
There is a small hole at the end of the knife for attaching a split ring or a lanyard to.
ERGONOMICS
There are two notches for placement of the fore finger and middle finger. One notch is in the handle and the other notch is where the blade and handle join together. I find my fingers fit comfortably in these grooves and the ergonomics of this knife to be acceptable. An addition I would like to see would be a thumb ramp at the back of the blade. This feature is present in my spyderco ladybug, and I find it useful to have a thumbrest that helps to brace the knife.
 |
| Two notches for placement of thumb and forefinger |

 |
| Thumb ramp on the spyderco ladybug |
TANTO VS DROP POINT
From what I gather with my reading, an 'american tanto' blade is better for piercing and puncturing objects. A drop-point blade has a 'belly' which is good for slicing. Drop-point blades are a more common 'all-rounder' blade format.
 |
| Drop point blade |
 |
| Tanto blade |
HANDLE MATERIAL
The scales or handles to these knives are made from G10. G10 scales seem to be more common on expensive knives, so it's nice getting an idea what it feels like on these cheaper knives. I quite like the feel of the textured G10 scales, it provides good grip when wet. I prefer the feel of these handles over my spyderco FRN handles (on the ladybug, stretch and salt). I do have to say though, the handles some how have a slightly cheap and ugly look to them (in my opinion).


STEEL
Both these knives are reported to be made from 8Cr13Mov steel. 8cr13Mov is used in some of the cheaper spyderco and the Byrd range of knives. It is meant to be comparable to AUS8 steel. However there is more to knife steel than the elements contained within. How the knife is tempered and heat treated by the manufacturer will affect it's properties.
SHARPNESS
When I received these out of the box, they were not very sharp. With a bit of work on my spyderco sharpmaker, I got them with a decent edge. I wasn't able to get it sharp enough to push paper or shave hair, but thats more likely due to my average sharpening skills. Even with the sharpmaker, I have trouble getting an ultra-sharp edge on my other knives.
RUSTING
I've used these knives for a couple months now, mainly for cutting and peeling some fruit and veges. I also occasionally use them for opening boxes or packages. I haven't treasured or taken particular care of these knives. Being a lazy grot, I often leave them overnight unwashed after cutting and peeling fruits. I've also washed them with detergent and left them to air dry (instead of wiping them down). I have noticed with time, a few spots of rust developing on the knife due this abuse. Most of these spots were able to be removed with a bit of washing and scrubbing.
CONCLUSION
In some circles this knife has been marketed as being a keychain knife. People will have a different opinion on what constitutes a keychain knife, but in my opinion I feel it is a little too big and heavy. I even find something on the lines of the spyderco ladybug, a little too large for my keychain preferences. Instead I feel the Sanrenmu GV-604 and GR5-605 knives would be better classified as a mini-EDC knife.
 |
| Spyderco bug, Spyderco ladybug, Sanrenmu GV-604, Sanrenmu GR5-605, Spyderco Salt I |

From what I gather, the 8Cr13Mov steel seems to offer decent performance at a good price point. Sure there are 'better' steels out there, but these exotic steels will be more expensive as well. These Sanrenmu knives feel comfortable in the hand, come with g-10 scales, have a removable clip... considering the knife costs $6 there's not much to complain about.
Whether you get the GR5-605 or GV-604, depends on personal preference on blade design. As mentioned earlier I prefer the drop point blade on the Sanrenmu '605'.
I feel these sanrenmu knives make good 'beater knives' where you can be rough with it, without worrying about babying the blade. If it breaks or chips, its not a big deal if you need to replace it.
OTHER KNIVES TO CONSIDER
There would be a whole range of knives that you could fit into this mini-EDC/large keychain knife category. Some that I have come across include:
spyderco ladybug - can come in a variety of more expensive steels (e.g. VG10 and H1). Lock-back mechanism
spyderco grasshopper - also 8Cr13Mov steel. Slip joint knife (which I believe is preferred in the UK)
boker plus keycom - has clip in tip-down position. AUS-8 steel
Monday, May 2, 2011
UltraFire WF504B XM-L T6 (5 Mode) - Silver [REVIEW]
UltraFire WF504B XM-L T6 (5 Mode) [REVIEW]
BACKGROUND
I received the Silver Ultrafire WF504B (with XML T6 and 5 modes) from Dealextreme for review purposes. Luckily it came in time before the Easter weekend, where I took it along with me for a night time bush walk up a small mountain. The trek took 2.5 hours to reach the summit outlook where we watched the sunrise in the east. Despite waking up very early in the morning and being sleep deprived, watching the sun break through the clouds and haze was totally worth it.

I will comment later on how the flashlight performed during this little night time adventure.
SPECIFICATIONS (AS GIVEN BY DEALEXTREME)
Brand: UltraFire
Model: WF504B
Emitter Brand/Type: CREE
Emitter BIN: XM-L T6
Color BIN: White
Total Emitters: 1
Battery Configurations: 1 x 18650 Rechargeable Battery (not included)
Voltage Input: 2.8~4.2V
Switch Type: Clicky/Clickie
Switch Location: Tail-cap
Modes: 5
Mode Memory: Yes
Mode Arrangement: Low > Mid > High > Fast Strobe > SOS
Circuitry: Digital Regulated 1400mA Current Output
Brightness: 510 lumens maximum brightness (manufacturer rated)
Runtime: 60min at high mode
Lens: Coated Glass Lens
Reflector: Aluminum Textured/OP Reflector
Dimensions: 5.35 in x 1.26 in x 1.26 in (13.6 cm x 3.2 cm x 3.2 cm)
Weight: 3.77 oz (107 g)
Cost: $20.40 (including shipping)
Web address: http://www.dealextreme.com/p/ultrafire-wf504b-xm-lt6-5-mode-510-lumen-white-led-flashlight-with-strap-silver-1-x-18650-57096
PACKAGING AND ACCESSORIES
The Ultrafire WF504B comes packaged quite plainly, wrapped in bubble wrap. Included is a black wrist strap of average quality.
DESIGN AND BUILD
The Ultrafire WF504B is flashlight host capable of using P60 sized drop-ins. For more information on what P60 drop-ins are, I would recommend you read this. Included in this particular package is a 5-mode drop-in with a CREE XM-L T6 LED.
Upon receiving the light I did notice a few minor points that put me off. For a start there was a great big dirty finger print on the reflector. The o-rings were already lubed, however the threads were not. In my sample there is a small machining spur on the tail-cap. These are minor issues that are easily solved but I did want to point them out. Considering this is a 'budget flashlight', I am more forgiving about these points.
The body of this light says CREE R2 which is quite misleading. I suspect ultrafire has used their standard Ultrafire WF504B host and has simply changed the drop-in to an XM-L T6 drop-in. The emitter in the drop-in does appear to be an XML LED.
This version of the Ultrafire WF504B comes with an OP (orange peel) reflector.
Around the base of the head is a hexagonal ring which prevents the light from rolling around, when horizontal. This 'anti-roll' feature is useful to have.
Knurling is present on the body and tail-cap of the flashlight. I find this knurling to be comfortable, not overly aggressive or rough, whilst still providing adequate grip.
The tail cap has a reverse clicky. The clicky button is slightly recessed, allowing you to tail stand the light. Personally, I prefer a light that can tail stand as it allows you to use the ceiling bounce for general lighting purposes.
With this 'silver' version of the Ultrafire WF504B, it is not annodised. This will have different wear characteristics to an annodised version.
This flashlight lacks the ability for 'tail-cap lockout'. 'Tail-cap lockout' refers to a feature where you can prevent the flashlight from accidentally switching on, by slightly untwisting the tail-cap. The threads of the flashlight need to be annodised for this feature to be present.
There is a black annodised version of this flashlight, but from the pictures on the website, the tail-cap threads appear unannodised and I would also suspect it also lacks tail-cap lockout. Without this other light in hand I can not confirm for sure.
I've found when using the high mode, the head of the flashlight can get quite hot, especially if you leave the light tail standing indoors for a prolonged period. When using it outside in a cool environment and holding the light with my hand, the flashlight head remains a comfortable temperature.
A common recommendation with P60 drop-ins is to add copper tape or aluminium foil around the drop-in. This allows better transfer of heat from the drop-in to the body of the flashlight.
LED, BRIGHTNESS AND BEAM CHARACTERISTICS
The Ultrafire WF504B features an XM-L T6 LED. For those of you who are not aware, XM-L is a fairly new series of LEDs produced by CREE. According to CREE the XML is ~20% more efficient than the XPG at the same current. The XML is also capable of handling higher currents (up to 3A) than the XPE, XRE or XPG LEDs. This translates to a higher brightness if the LED is driven hard enough.
Tail-cap readings of the flashlight with a fully charged Redilast 2900mah 18650 battery were:
high - 1.49A
med - 0.64A
low - 0.07A
From the CREE data sheet expected LED lumens at these currents would be:
high: ~530 lumens
medium: ~250 lumens
low: ?? - hard to determine via data sheet, but by eye, I would estimate ~10-20 lumens

Take these readings and calculations with a grain of salt. I do have to say, my DMM (digital multimeter) is fairly cheap and is not calibrated, so I would consider the tail-cap readings as estimates only. The Redilast battery has only been through a few usage cycles, tail-cap readings with some older and heavily used trustfire batteries were lower (some as low as 1.1A-1.2A). The high and medium lumen ratings are 'LED lumens' based on calculations, not 'out the front' (OTF) lumens.
In theory, the XM-L could be driven much harder and brighter on high (~900 lumens @ 3.0A). However you would get issues with heat management and reduced run-times.
The XML LEDs have a larger die than XPG, XRE or XPE LEDs. This translates to a beam that tends to be more floody with a larger hotspot (if using the same sized reflector). The max brightness of the XML tends to be higher than the afore mentioned LEDs, this helps to make up for some of the loss in throw.
I find the Ultrafire WF504B XML gives a nice floody wall of light that lights up the first 10-20 metres. It doesn't tend to throw very well, and I find the hotspot gets lost if you are looking at something more than ~50m away. I might see if I can find a SMO (smooth) reflector to replace into this light. A SMO reflector tends to provide more throw than an OP reflector.
My sample of this flashlight has a nice clean white tint.
Beamshots were taken at ~20 metres away. ISO 400, f 2.0, 2" . In person, I feel the lights are more floody than what appears in the beamshots.
USER INTERFACE AND OUTPUTS
This version of the Ultrafire WF504B has 5 modes; high, medium, low, fast strobe and SOS. To switch between the modes you need to turn the light off and on within ~1 second. A quick 'half-press' while the flashlight is turned on, will also allow you to cycle through the modes. If you leave the light off for more than ~2 seconds, it will remember the last mode and turn on again in that mode.
Unfortunately due to the user interface, you will need to cycle past strobe and SOS whenever you want to go from lower mode to a higher mode. This can be quite annoying at times.

If you do not like multi-mode lights, do note that Dealextreme offer a single mode version of the flashlight that runs only on high.
http://www.dealextreme.com/p/ultrafire-wf504b-xm-lt6-510-lumen-white-led-flashlight-with-strap-silver-1-x-18650-57098
http://www.dealextreme.com/p/ultrafire-wf504b-xm-lt6-510-lumen-white-led-flashlight-with-strap-black-1-x-18650-57097
I do note there is PWM regulation on the medium and low modes. During actual usage, I find the PWM unnoticeable on low and just barely noticeable on medium.
PERFORMANCE DURING MY HIKE
During my night time walk, there were sections that were very steep, requiring both hands and usage of a headlamp would be recommended. But otherwise, I was quite happy with the performance of the Ultrafire 504B XML T6, as a hand held held flashlight. I was at the front of our group and I found the Ultrafire flashlight provided a nice wall of light for lighting up the trail ahead.
During most of the walk I used the Ultrafire WF504B XML in medium mode. I found medium offered an adequate amount of brightness for lighting up the trail. Towards the end of the trek, there was a lot of fog and haze which absorbs a lot of the light. During this period I ran the light on high for max brightness.
In theory medium mode would have lasted me until the end of the 2.5 hour trek up. However when I started using high more often, I changed the battery as I did not want to overdischarge the li-ion battery. During the walk back down, the sun was already up so no flashlights or headlamps were required (unfortunately).
CONCLUSIONS
For ~$20 shipped the Ultrafire WF504B XML T6 is a reasonable buy. For that price you get one of the latest XM-L drop-ins and a P60 flashlight host. Being a P60 flashlight host means it is easy if you want to upgrade or switch emitters... all you need to do is buy a different drop-in.
The XM-L drop-in in the package provides a nice floody wall of light but not much throw. Driven at ~1.4A on high, it gives an acceptable runtime on high whilst still giving you a good amount of light. I would consider spacing between high, medium and low modes to be pretty good. The low is a fairly bright low, so if you prefer low-lows this is not for you.
Unforunately with the 5 mode version of the Ultrafire WF504B XML T6, you constantly have to cycle past the rarely used strobe and SOS modes when switching from a lower mode to a higher mode. I would prefer it if dealextreme offered a version with only high/medium/low and NO strobe or SOS modes.

ALTERNATIVES TO CONSIDER
I've never really gotten into p60 hosts before; this is my first p60 host flashlight. However some other P60 hosts brands you could consider are solarforce (these have a good reputation of price vs quality) or the original surefire hosts ($$$).
ADDITIONAL PHOTOS

[If you have any trouble understand some of the flashlight terms used in this post, see my 'links' page for a link to a glossary of terms]
BACKGROUND
I received the Silver Ultrafire WF504B (with XML T6 and 5 modes) from Dealextreme for review purposes. Luckily it came in time before the Easter weekend, where I took it along with me for a night time bush walk up a small mountain. The trek took 2.5 hours to reach the summit outlook where we watched the sunrise in the east. Despite waking up very early in the morning and being sleep deprived, watching the sun break through the clouds and haze was totally worth it.

I will comment later on how the flashlight performed during this little night time adventure.
SPECIFICATIONS (AS GIVEN BY DEALEXTREME)
Brand: UltraFire
Model: WF504B
Emitter Brand/Type: CREE
Emitter BIN: XM-L T6
Color BIN: White
Total Emitters: 1
Battery Configurations: 1 x 18650 Rechargeable Battery (not included)
Voltage Input: 2.8~4.2V
Switch Type: Clicky/Clickie
Switch Location: Tail-cap
Modes: 5
Mode Memory: Yes
Mode Arrangement: Low > Mid > High > Fast Strobe > SOS
Circuitry: Digital Regulated 1400mA Current Output
Brightness: 510 lumens maximum brightness (manufacturer rated)
Runtime: 60min at high mode
Lens: Coated Glass Lens
Reflector: Aluminum Textured/OP Reflector
Dimensions: 5.35 in x 1.26 in x 1.26 in (13.6 cm x 3.2 cm x 3.2 cm)
Weight: 3.77 oz (107 g)
Cost: $20.40 (including shipping)
Web address: http://www.dealextreme.com/p/ultrafire-wf504b-xm-lt6-5-mode-510-lumen-white-led-flashlight-with-strap-silver-1-x-18650-57096
PACKAGING AND ACCESSORIES
The Ultrafire WF504B comes packaged quite plainly, wrapped in bubble wrap. Included is a black wrist strap of average quality.
DESIGN AND BUILD
The Ultrafire WF504B is flashlight host capable of using P60 sized drop-ins. For more information on what P60 drop-ins are, I would recommend you read this. Included in this particular package is a 5-mode drop-in with a CREE XM-L T6 LED.
 |
| P60 host components - head, drop-in, body, tail-cap |
Upon receiving the light I did notice a few minor points that put me off. For a start there was a great big dirty finger print on the reflector. The o-rings were already lubed, however the threads were not. In my sample there is a small machining spur on the tail-cap. These are minor issues that are easily solved but I did want to point them out. Considering this is a 'budget flashlight', I am more forgiving about these points.
 |
| R2 written on the body (look under the symbol to the right of CREE for R2) |
 |
| OP reflector and CREE XM-L LED |
This version of the Ultrafire WF504B comes with an OP (orange peel) reflector.
Around the base of the head is a hexagonal ring which prevents the light from rolling around, when horizontal. This 'anti-roll' feature is useful to have.
 |
| Hexagonal ring at the end of the head which acts as an anti-roll feature |
Knurling is present on the body and tail-cap of the flashlight. I find this knurling to be comfortable, not overly aggressive or rough, whilst still providing adequate grip.
The tail cap has a reverse clicky. The clicky button is slightly recessed, allowing you to tail stand the light. Personally, I prefer a light that can tail stand as it allows you to use the ceiling bounce for general lighting purposes.
 |
| Recessed reverse clicky switch. Note there are two holes for threading through the lanyard |
With this 'silver' version of the Ultrafire WF504B, it is not annodised. This will have different wear characteristics to an annodised version.
This flashlight lacks the ability for 'tail-cap lockout'. 'Tail-cap lockout' refers to a feature where you can prevent the flashlight from accidentally switching on, by slightly untwisting the tail-cap. The threads of the flashlight need to be annodised for this feature to be present.
There is a black annodised version of this flashlight, but from the pictures on the website, the tail-cap threads appear unannodised and I would also suspect it also lacks tail-cap lockout. Without this other light in hand I can not confirm for sure.
I've found when using the high mode, the head of the flashlight can get quite hot, especially if you leave the light tail standing indoors for a prolonged period. When using it outside in a cool environment and holding the light with my hand, the flashlight head remains a comfortable temperature.
A common recommendation with P60 drop-ins is to add copper tape or aluminium foil around the drop-in. This allows better transfer of heat from the drop-in to the body of the flashlight.
 |
| Aluminum foil added to the P60 drop-in. This allows better transfer of heat to the body of the flashlight |
LED, BRIGHTNESS AND BEAM CHARACTERISTICS
The Ultrafire WF504B features an XM-L T6 LED. For those of you who are not aware, XM-L is a fairly new series of LEDs produced by CREE. According to CREE the XML is ~20% more efficient than the XPG at the same current. The XML is also capable of handling higher currents (up to 3A) than the XPE, XRE or XPG LEDs. This translates to a higher brightness if the LED is driven hard enough.
Tail-cap readings of the flashlight with a fully charged Redilast 2900mah 18650 battery were:
high - 1.49A
med - 0.64A
low - 0.07A
From the CREE data sheet expected LED lumens at these currents would be:
high: ~530 lumens
medium: ~250 lumens
low: ?? - hard to determine via data sheet, but by eye, I would estimate ~10-20 lumens

Take these readings and calculations with a grain of salt. I do have to say, my DMM (digital multimeter) is fairly cheap and is not calibrated, so I would consider the tail-cap readings as estimates only. The Redilast battery has only been through a few usage cycles, tail-cap readings with some older and heavily used trustfire batteries were lower (some as low as 1.1A-1.2A). The high and medium lumen ratings are 'LED lumens' based on calculations, not 'out the front' (OTF) lumens.
In theory, the XM-L could be driven much harder and brighter on high (~900 lumens @ 3.0A). However you would get issues with heat management and reduced run-times.
The XML LEDs have a larger die than XPG, XRE or XPE LEDs. This translates to a beam that tends to be more floody with a larger hotspot (if using the same sized reflector). The max brightness of the XML tends to be higher than the afore mentioned LEDs, this helps to make up for some of the loss in throw.
I find the Ultrafire WF504B XML gives a nice floody wall of light that lights up the first 10-20 metres. It doesn't tend to throw very well, and I find the hotspot gets lost if you are looking at something more than ~50m away. I might see if I can find a SMO (smooth) reflector to replace into this light. A SMO reflector tends to provide more throw than an OP reflector.
My sample of this flashlight has a nice clean white tint.
Beamshots were taken at ~20 metres away. ISO 400, f 2.0, 2" . In person, I feel the lights are more floody than what appears in the beamshots.
 |
| High |
 |
| Medium |
 |
| Low |
 |
| Control |
USER INTERFACE AND OUTPUTS
This version of the Ultrafire WF504B has 5 modes; high, medium, low, fast strobe and SOS. To switch between the modes you need to turn the light off and on within ~1 second. A quick 'half-press' while the flashlight is turned on, will also allow you to cycle through the modes. If you leave the light off for more than ~2 seconds, it will remember the last mode and turn on again in that mode.
Unfortunately due to the user interface, you will need to cycle past strobe and SOS whenever you want to go from lower mode to a higher mode. This can be quite annoying at times.

If you do not like multi-mode lights, do note that Dealextreme offer a single mode version of the flashlight that runs only on high.
http://www.dealextreme.com/p/ultrafire-wf504b-xm-lt6-510-lumen-white-led-flashlight-with-strap-silver-1-x-18650-57098
http://www.dealextreme.com/p/ultrafire-wf504b-xm-lt6-510-lumen-white-led-flashlight-with-strap-black-1-x-18650-57097
I do note there is PWM regulation on the medium and low modes. During actual usage, I find the PWM unnoticeable on low and just barely noticeable on medium.
PERFORMANCE DURING MY HIKE
During my night time walk, there were sections that were very steep, requiring both hands and usage of a headlamp would be recommended. But otherwise, I was quite happy with the performance of the Ultrafire 504B XML T6, as a hand held held flashlight. I was at the front of our group and I found the Ultrafire flashlight provided a nice wall of light for lighting up the trail ahead.
 |
| Portion of the trek where ascent is near vertical. Chain handrail is needed for support. |
During most of the walk I used the Ultrafire WF504B XML in medium mode. I found medium offered an adequate amount of brightness for lighting up the trail. Towards the end of the trek, there was a lot of fog and haze which absorbs a lot of the light. During this period I ran the light on high for max brightness.
 |
| Haze and fog during the night time walk |
In theory medium mode would have lasted me until the end of the 2.5 hour trek up. However when I started using high more often, I changed the battery as I did not want to overdischarge the li-ion battery. During the walk back down, the sun was already up so no flashlights or headlamps were required (unfortunately).
 |
| First light |
 |
| Sunrise! |
CONCLUSIONS
For ~$20 shipped the Ultrafire WF504B XML T6 is a reasonable buy. For that price you get one of the latest XM-L drop-ins and a P60 flashlight host. Being a P60 flashlight host means it is easy if you want to upgrade or switch emitters... all you need to do is buy a different drop-in.
The XM-L drop-in in the package provides a nice floody wall of light but not much throw. Driven at ~1.4A on high, it gives an acceptable runtime on high whilst still giving you a good amount of light. I would consider spacing between high, medium and low modes to be pretty good. The low is a fairly bright low, so if you prefer low-lows this is not for you.
Unforunately with the 5 mode version of the Ultrafire WF504B XML T6, you constantly have to cycle past the rarely used strobe and SOS modes when switching from a lower mode to a higher mode. I would prefer it if dealextreme offered a version with only high/medium/low and NO strobe or SOS modes.

ALTERNATIVES TO CONSIDER
I've never really gotten into p60 hosts before; this is my first p60 host flashlight. However some other P60 hosts brands you could consider are solarforce (these have a good reputation of price vs quality) or the original surefire hosts ($$$).
ADDITIONAL PHOTOS
 |
| Ultrafire WF504B at the summit outlook |
 |
| P60 components (alternate views) |

[If you have any trouble understand some of the flashlight terms used in this post, see my 'links' page for a link to a glossary of terms]
Subscribe to:
Posts (Atom)