Monday, November 14, 2011

MY KEYCHAIN SETUP FOR TRAVEL

Sorry for the lack of updates, I've been traveling around the USA for the past 4 weeks.  On my way, I picked up a few interesting keychain items which I plan to post about in the next few updates.

Out of interest, here's the keyring setup I was carrying for my travels:

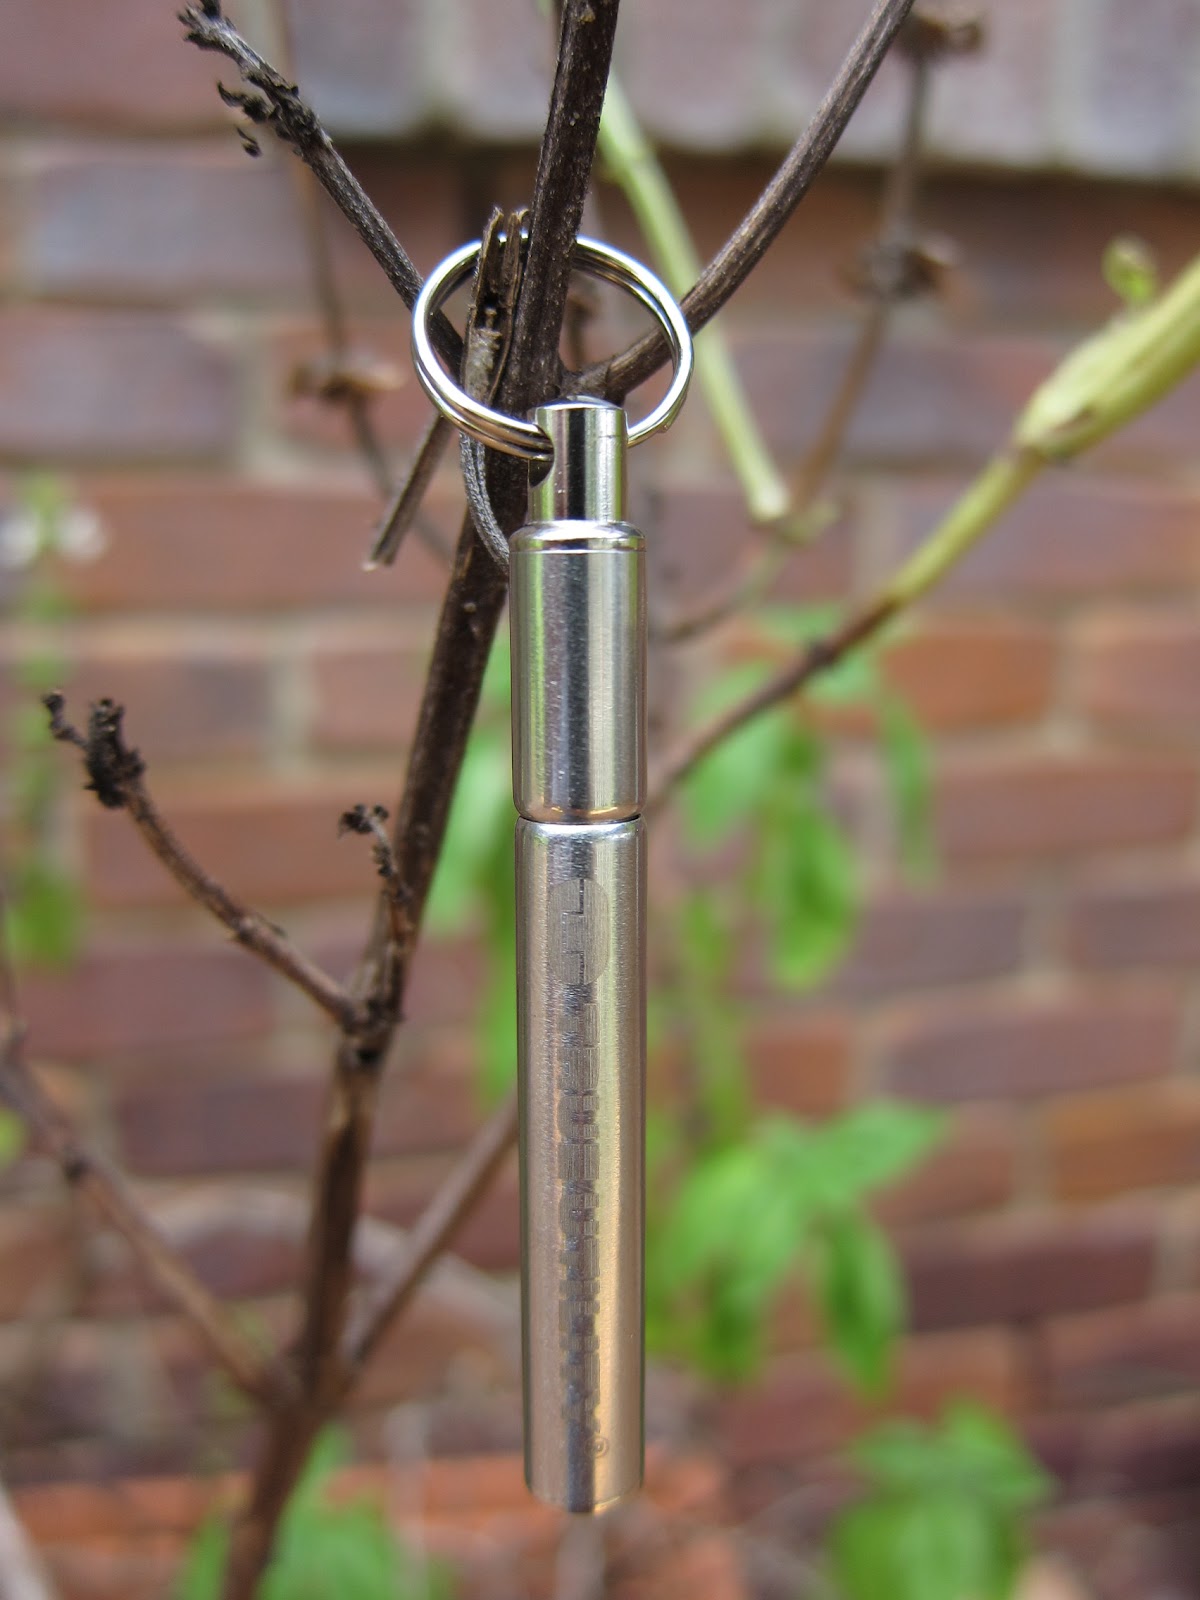
-true utility telepen
-photon freedom
-'mini' dogtag with name and email address (I've blanked my personal details out).  These were bought from http://www.mydogtag.com
-swisstech utili-key
-tritium vial
-size 0 nite-ize s-biner

I brought along the swisstech utili-key because it's light and unobtrusive.  It came in handy cutting some clothing tags, and some other odd jobs.  I put the keychain away in my backpack during security checks, and the utili-key  managed to pass through without any problems. 

The empty s-biner was used for attaching and detaching things to the keyring.


Friday, October 7, 2011

Keychain Pen Review; Picopen vs Telepen

KEYCHAIN PENS:

Tec Accessories Pico Pen vs True Utility Telepen


I've had the tec accessories picopen for a little while now and I've been meaning to compare it to my other keychain pen; the true utility telepen (reviewed here).  Here are some of the differences, that I note.


Above: True utility telepen, Below: Tec accessories picopen


PACKAGING

The tec accessories pico pen comes nicely packaged in a metal box.  Included in the box is a bunch of accessories including: a gate clip, small split ring, wire cable keychain, stylus/pda insert and instruction manual/information card.


Pico pen with included accessories, packaged in a rectangular metal tin


The true utility telepen comes in a clamshell packaging.  Between the two, I feel the pico pen looks better when giving it as a gift.  The added accessories and better packaging makes it look classier.


SIZE AND SPECIFICATIONS

Both pens are comparable in size.  The tec accessories pico pen is slightly longer, but is also slightly slimmer than the telepen.


COST

True Utility Telepen: GB £4.99
Tec Accessories Picopen: US $19.95

Using the current coversion rates, the telepen is less than half the price of the picopen.


BUILD QUALITY


The tec accessories picopen feels solid and well made, I haven't noticed any issues in build quality during my time with this pen.  With the telepen, I do note there is some wobble and play in the telescoping segments.  Also, as mentioned in the telepen review, I had some issues taking out the refill catridge.  Neither are huge issues, but something to point out.

It may be that their range is smaller and simpler design, but in general I find the build quality of items from tec accessories to be pretty good (e.g. the p7 suspension clip and glow fob).  I find some of the stuff from true utility can sometimes be a mixed bag.  The Firestash I have, has since come apart and I can not get the wick back in.

Having said that, true utility's offerings usually come at a fairly affordable price. And, if anything does go wrong, I have read on some forums, they have pretty good customer service.


USAGE

When actually using these pens, I prefer the feel of the true utility telepen.  The telescoping ability of the telepen makes it more versatile, allowing you to adjust the length.  The width of the telepen is also controllable, to a certain degree.  I find the the pico pen a little too small and thin to grasp comfortably.  For me, the picopen would be a last resort writing utensil.


OTHER

Both these keychain pens can use normal pen refills.  You can also buy official pico pen refills, which are stainless steel (instead of the usual plastic refills).

The pico pen comes with a stylus/pda insert, which can be used instead of the pen cartridge.  I don't have any pda's to test it on, but it doesn't work with my current smart phone.

One downside I find with the tec accessories pico pen, is the magnet in the keyring attachment.  This magnet does the job of holding the pico pen firmly in place.  However, I find the magnet also attracts other metal components on my keyring.  These components (such as split rings, clips and snap gates), annoyingly, get stuck to the keyring attachment.  I'd also be concerned about keeping the magnet near magnetically sensitive objects like credit cards.

There is a magnet in the keyring attachment of the pico pen


CONCLUSIONS

Given a choice between the two, I would prefer the carry the true utility telepen on my keyring.  I find the tec accessories picopen more difficult to use, and I am not a fan of magnetic attachment.  The picopen does make good gift, presentation-wise.

In future I hope to try the valiant concepts keychain pen.  Once again, the smaller size may make it more difficult to use than a telepen, but I would like to test out a keychain pen that uses a Fisher ink cartridge.  These ink cartridges are meant to write on more surfaces, as well as upside down.


LINKS

http://www.trueutility.com/pocket-tools-store/telepen.html
http://www.tecaccessories.com/products/product.php?II=13

Friday, September 23, 2011

Custom Keychain Lights to Look Out For

At the moment there are a couple of custom or semi-custom keyring lights that are in the process of being designed and made.  If you are interested, I'd suggest you subscribe to the forum threads and follow the progress of these lights.  They can often sell out quickly, so keep and eye out on them.

First one is the new variant of the 38DD from Steve Ku at cpfmarketplace.  The previous runs of the 38DD were in titanium, but the new run of this light is going to be in stainless steel.  As a result of this, the cost is significantly less, estimated to be $60-85.  The design has changed a little, have a  look at Steve's facebook page for some CAD renderings of the new 38DD.

Here are a few preliminary specifications from the cpfmarketplace thread:
Stainless steel shell
Sapphire lens.
Smooth and spot TIR.
XP-G 1c cool, 5b neutral, 7b high CRI.
2 trit slots, just about every color trit you've ever seen is available.
3.2mm hole

Having one of the 38DD from the second titanium run, there were a few potential issues that I feel I need to point out before  recommending this light.
-Even if you choose the spot TIR option, the light is pretty floody, with a large hotspot.  This makes the flashlight seem less bright than what it is (often people perceive a light with less lumens, but tighter hotspot to be 'more' bright).  Given a choice, I would prefer the light to be slightly less floody.  YMMV, you may prefer a floody light for keychain purposes.
-I'm not 100% convinced of  the benefits of QTC.  In my sample of the 38DD, I find it takes a lot of force to fully compress the QTC for max brightness.  If you compress the light too much, you can dent the 10180 battery.  Hopefully this issue can be addressed in the new run.

LINKS:
Veleno Designs Facebook Page
38DD thread on cpfmarketplace
Photos of titanium 38DD from the second run


38DD from second titanium run, custom annodisation

--------------

The next light is a from a new maker who has popped up on candlepowerforums.  He certainly has grand goals which push the boundaries.  The flashlight is still being designed but the maker has taken in a lot of input from CPF.  I've found it enjoyable following the thread, seeing the interaction between the maker and CPF.

This light is called the MBI torpedo and it has the goal of providing 500 lumens from a AAA sized light.  There's a lot of doubts on whether this is possible and whether it is practical.  Have a look at the thread for more discussion on this.

Here are some preliminary specifications which are subject to change:

MEASUREMENTS:
AAA Body length: 82mm
10280 Body length: 64mm
Diameter: 14mm

SWITCH:
tighten = off has been verified
loosen = change mode has been verified

For now, it takes a half rotation to switch to the next mode.

MODES:  (n.b. hotly debated and subject to change)
Mode 1:       2mA (approx. 1 lumen)
Mode 2:     25mA (approx. 10 lumen)
Mode 3:   250mA (approx. 100 lumen)
Mode 4:   750mA (approx. 300 lumen)
Mode 5: 1400mA (approx. 500 lumen)

Parasitic Drain = Zero.
Thermal step down
Overdischarge protection
Estimated cost ~$65

LINKS:
MBI torpedo thread on candlepowerforums
Email subscription page for updates on the MBI torpedo


Some initial CAD drawings of the MBI torpedo.  Note this light is still under development with specifications subject to change

Thursday, September 1, 2011

My Every Day Carry (EDC)

Here is what I currently EDC:


-Paul Smith wallet
-Wedding band

-HTC legend smartphone (I'm finding this phone has a few issues, I'll probably look at changing phones when my current phone plan expires)

Car Keyring:
-Wire cable loop
-Car key
-Car remote
-Swissbianco alox rambler (attached with 'split ring swivel' and small lanyard hook)
-Circular tag engraved with my name and mobile phone number  (attached to keyring with a swivel)
-Tec accessories s3 glow fob with green tritium insert (also attached to the swivel with the engraved tag)
-Steve ku 38DD flashlight (with customised annodising by sabrewolf) - this has two blue trits, but they are not very bright.  The tec accessories glow fob provides more noticeable illumination.

House keys attached to car keys by a larger lanyard hook:
-Normal split ring
-House keys
-Tec accessories p7 suspension clip

For night time, I usually carry an extra torch/flashlight.
If I want something slim, I carry:
-Preon 1 with clicky switch, running on 10440 li-ion battery.  Small phone lanyard strap with tritium attached
If I can carry the extra thickness:
-Zebralight sc50+, running on 14500 li-ion.  Glow-in-the-dark lanyard from lighthound, tritium attached to lanyard.

Tuesday, August 9, 2011

Nite Ize S-Biner Keyring

 Nite Ize S-Biner Keyring System


BACKGROUND

I recently got a $5 voucher from a Dealextreme Facebook promotion... so I was looking for something to blow the $5 on and came across this:  the Nite Ize S-Biner Keyring.  I'm pretty happy with my current keychain setup with the wire loop and various lanyard hooks, but I was keen to give this Nite Ize keyring system a go.  Even if I don't like it, it's always handy to have a few extra clips and keychain hardware.  The version I got has the 'spectrum' stainless steel ring.  The spectrum ring has a metallic multi-colour sheen, similar in appearance to some heat-treated titanium.


PRODUCTION INFORMATION


I'm feeling lazy so I pulled this from the Nite Ize website.  Pardon me if it sounds too much like advertising spiel.

-Available in Black, Stainless & Spectrum Stainless Steel Rings
-Packaged with 6 Plastic Size #0 S-Biners
-6 different color S-Biners allow for easy identification of similar style keys
-Product Dimensions: 2.2" x 1.3" x .5"

"Our S-Biner KeyRing features six different-colored, lightweight plastic S-Biners that attach quickly and securely to a sturdy, solid, stainless steel ring. It's easy to hang on hooks or loop through cord. Use one of the plastic S-Biners to attach the whole unit to a second key ring, belt loop, purse strap, or zipper pull—anything with a loop or D-ring. The 6 plastic S-Biners the Key Ring comes with are perfectly sized to hold 6 separate keys, their vivid different colors allow you to identify your keys at a glance, and they attach and release from the Key Ring with ease. More S-Biners can be ordered separately — the Key Ring can hold dozens of them. No more fiddling with split rings or fumbling to find the key you need — the Key Ring is perfect for quick and easy sharing of keys with family members, co-workers, valets, babysitters, and for taking a single key with you when you're out on a run or ride."

Manufacturer's Website: 
http://www.niteize.com/products/s-biner-keyring


PACKAGING 


SIZE COMPARISONS AND PHOTOS


25mm micro mcgizmo clip, 34mm mini mcgizmo clip, true utility clip (from the keyring system), size 0 s-biner, 3 x lanyard hooks from various sources

size 0 s-biner (top), 'spectrum' solid stainless steel ring (bottom)

Clips colours: black, grey, orange, purple, red, green


THOUGHTS

I've been using this keyring system for a couple of weeks now.  I'll break down my thoughts about this keyring system into some simple pros and cons.

Pros:
-Comparatively light weight due the plastic components
-Colourful, especially with the spectrum solid ring (this may be a con if you are after something less bright and flamboyant)
-Different coloured clips help make it easier to differentiate between your various keys
-Fairly cheap (I got them from Dealextreme for $4 shipped)
-The S-biner design allows you to clip or unclip from either end of the s-biner

Cons:
-The s-biners are slightly larger and bulkier compared to some other clips
-Plastic components may potentially be less durable than stainless steel clips??  This is purely conjecture.  If you're not putting the clips to major abuse, the plastic s-biner will probably suffice
-I found it very hard getting thicker keys, such as my car keys and car remote, onto these 'size 0' s-biners
-I don't know if this relates specifically to this model of the Nite Ize clips, but the s-biner has a reputation of coming apart.  Have a look at these threads on EDC forums and make up your own mind.
http://edcforums.com/showthread.php/57309-DO-NOT-Trust-the-S-Biner?highlight=s-biner
http://edcforums.com/showthread.php/84316-S-Biner-issue?highlight=s-biner


CONCLUSIONS

The main advantage I see about the s-biners are they can clip and unclip from either end of the s-biner, something most other clips can not do.  I do have to say I have gotten very comfortable with my previous keychain setup, and will probably switch back to that later on.  My previous keyring setup is less bulky and works well for me.


OTHER OPTIONS TO CONSIDER


Nite Ize make some other keyring products using the 'size 0' s-biners.  Note the 'key-rack plus' also has a bottle opener feature.
http://www.niteize.com/products/s-biner-keyrack-plus
http://www.niteize.com/products/key-rack

True Utility Key Ring System
http://www.trueutility.com/pocket-tools-store/true-utility-tu45-keyring-system.html

Troika Patent Keyring/Troika Valet Multi Keyring
http://troikacatalog.com/keyrings/2616-troika-valet-multi-keyring.html

Also similar to the troika keyring is the EDCF keyholder
http://www.jsburlys.com/index.php?app=ecom&ns=prodshow&ref=edcf_keychain

Sunday, July 24, 2011

TEC ACCESSORIES GLOW PELLET KIT - TRITIUM INSTALLATION WITH NORLAND 61

I have previously done a review of the TEC accessories glow fob.  A GITD pellet is contained with in this glow fob.  I prefer tritium which constantly glows and does not need to be 'charged up' with light.  Tec accessories sells a glow fob pellet kit, for replacing the stock GITD pellet with something else.

I did a post here on how to temporarily install a tritium vial into one of these empty glow pellets.  This solution has been working reasonably well, but I've decided to glue the tritium in permanently with some norland 61.  Having tried green, blue and yellow tritium, I've decided to go with green as it is definitely the most brightest and most noticeable out of all the colours.

Here is a video on my technique for installing the tritium into these empty glow pellet tubes.  I do admit my technique could do with a bit of refinement... cleaning up the blu-tack is bit of a pain.


Just to recap, here is where I get my stuff from:
-The 3x23mm tritium is from:
http://www.cpfmarketplace.com/mp/showthread.php?170374-For-Sale-Tritium-Vials
-The TEC Accessories Glow Pellet Kit from:
http://www.tecaccessories.com/products/product.php?II=33
-Norland 61:
http://www.cpfmarketplace.com/mp/showthread.php?232854-Norland-61-Optical-Adhesive-for-Trit-installation

Summary of tips to install the tritium:
-Use a bit of blu-tack to block off one end of the empty vial
-You can use a flat end of a toothpick (or similar device) to neaten up the blu-tack if you have pushed it in too far
-Hold the empty vial at an angle, flow the Norland 61 slowly from one side. Let gravity slowly flow the liquid down to the end of the vial. This helps to avoid trapping dead air at the end of the vial.
-Only fill the tube about 1/3 of the way
-Gently insert the 23x3mm tritium. The Norland 61 will flow up the vial as you push it in.
-Leave it upright in bright sunlight or use a UV light to set the Norland 61
-Clean up the blu-tack. Use other larger bits of blu-tack to help pull it out. You can use a toothpick or a small brush to help remove the residual blu-tack
 -Top up the rest of the tube with Norland 61, set it again in UV light or sunlight.


Here is link to a PDF made by TEC accessories on various methods of using the glow pellet kit:
http://www.tecaccessories.com/PDF/TA_DIY_Kit_Trit_Project.pdf

Tuesday, July 5, 2011

18650 BATTERY COMPARISON

18650 BATTERY COMPARISON

Review of Protected Soshine 2800mah 18650 and Protected Trustfire 2400mah 18650


BACKGROUND

The Ultrafire WF504B which was reviewed earlier, uses a 18650 battery.  I also plan on posting up reviews of some other 18650 flashlights in future, so I thought it would be a good to do an article on these batteries.

For those of you not familiar with the term, '18650' refers to a lithium ion battery size.  In theory the battery should measure 18mmx65mm and be cylindrical (I believe the '0' at the end of '18650' is a reference to the shape).  You will often find there is some variation in the actual size of 18650 batteries.  Some 18650 have a protection circuit which will add further length.  Labels and packaging can also affect the size.

18650 batteries are most commonly found inside laptop battery packs, but they have also been taken up by the flashlight community for powering flashlights.  The benefit of these batteries are they can be very energy dense... they can hold alot of energy for it's size.

Before using lithium-ion (li-ion) batteries, it is important to familiarise yourself with the different sorts of li-ion batteries, how to use them safely and how to prolong the life of the batteries.  If care is not taken, some types of li-ion batteries can vent and explode!  At the end of this post, I've included a few articles and threads with further info on li-ion batteries.

I received a couple of different 18650 batteries from Dealextreme for review.  Included were the protected Soshine 2800mah and protected Trustfire 2400mah (black/red/flames packaging).

I was interested to compare these to some other 18650 batteries I have, including the same Trustfire 2400mah, but older and heavily used.


PACKAGING

The packaging for the Protected 2400mah Trustfire batteries is quite rudimentary.  They come in a two pack with shrink wrap around the outside.


The packaging for the Protected 2800mah Soshine batteries are more professional.  They come in a two pack in a clamshell packaging.  A bonus battery case is included.


TESTING METHODOLOGY

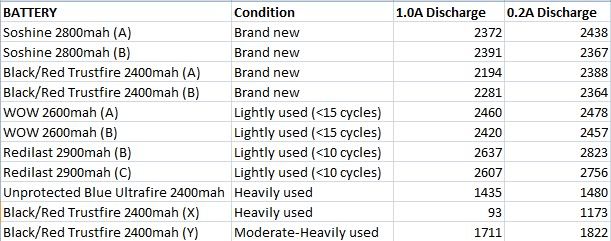
These batteries were all initially charged on a Pila IBC charger using the same channel on the charger.  They were then discharged on an Accucell 6 charger at different discharge rates (0.2A and 1.0A).  The Accucell 6 discharges the cell until they reach 3.0V (under load).  You should note some batteries such as the panasonic NCR18650 and NCR18650a can be discharged down to 2.5V.  Since the Accucell terminates at 3.0V, in theory these types of batteries can still be discharged slightly further and provide more capacity. The redilast 2900mah are based on the panasonic ncr18650.

I have included a rough estimate on how heavily used the various batteries are. 

I have to say the older batteries have seen some significant use and moderate abuse.  The unprotected blue 2400mah ultrafire and protected 2400mah trustfire (X), have seen quite a few cycles, some of which they were deeply discharged.  The more heavily used trustfire (X) and was then used with trustfire (Y) in a 2x18650 flashlight (only for a few cyles).  Trustfire (Y) had not been as heavily used as trustfire (X).  Do note; it is NOT recommended to use two poorly matched batteries in a multi-cell light.  I feel this incorrect use of these two batteries, may have result in some damage to both the trustfire cells.


RESULTS


CONCLUSIONS

Under lower current draw (0.2A) conditions the Black/red/flames Trustfire do provide close to the advertised capacity.  Under 1A current draw they still provide around 2200mah or more.  There is some doubt on how well these batteries keep that capacity after many cycles.  My older black/red/flames trustfire have lost a significant amount of capacity, with one developing high internal resistance.  I do have to say these older batteries have been through some abuse. 

For under $10 for two (shipped), they do represent a good buy, if you accept they may not last as long.  (It would be interesting to test my redilast 2900mah after they have been through a similar about of cycles and abuse, to see if these more expensive cells do indeed last longer.)  You should also note some people report there to be variation between various batches of these same batteries.

In my samples of the soshine 2800mah batteries, they are quite short of their rated capacity.  In my tests I only get around 2400mah from these cells.  I have a feeling I have gotten an older batch.  After charging the batteries to 4.20V, they do drop down to 4.13V after resting for a period.  This is a significant drop in voltage and may indicate they are older or used batteries.  Considering the soshine 2800mah are more expensive than the trustfire 2400mah, I feel I can not recommend these batteries.  There are better buys elsewhere.


LINKS:

Here a few articles on 18650 batteries

http://batteryuniversity.com/learn/article/lithium_ion_safety_concerns
http://batteryuniversity.com/learn/article/how_to_prolong_lithium_based_batteries
http://batteryuniversity.com/learn/article/lithium_based_batteries


http://www.candlepowerforums.com/vb/showthread.php?312835-Beyond-the-basics-for-Li-ion-safety
http://www.candlepowerforums.com/vb/showthread.php?178133-Are-Li-Ion-Batteries-really-dangerous
http://www.candlepowerforums.com/vb/showthread.php?35282-Li-Ion-FAQ-amp-Safety

http://www.redilast.com/index.php?option=com_content&view=article&id=51&Itemid=85
http://budgetlightforum.com/node/1825


Links for buying the protected soshine 2800mah and protected Trustfire 2400mah:


http://www.dealextreme.com/p/soshine-protected-18650-3-7v-2800mah-lithium-batteries-with-case-black-2-battry-pack-31896
http://www.dealextreme.com/p/trustfire-protected-18650-3-7v-true-2400mah-rechargeable-lithium-batteries-2-pack-20392

Friday, June 10, 2011

Egear Pico Zipper Lite VS Streamlight Nano Comparison

Egear Pico Zipper Lite VS Streamlight Nano Comparison


Having reviewed the streamlight nano, I was keen to see how it compared to the egear pico zipper lite.  Both these flashlights are quite similar and I would consider them to be direct competitors to each other.  They both run on 4xLR41 batteries and are comparable in size. 


BUILD AND CONSTRUCTION

The egear pico zipper lite has a slightly wider battery tube than the streamlight nano.  However, in practice, I find this difference in size is barely noticeable.

Size Comparison: Steve Ku 38DD, streamlight nano, egear pico zipper lite, modamag drake

One of the reasons why the pico lite has a wider battery tube is because it also has a 'battery carrier' inside.  This carrier makes it easier to load the batteries into the flashlight, when compared to the streamlight nano.

Battery carrier in the Egear pico zipper lite

I have not come across many complaints of the egear pico zipper lite coming apart, though I wouldn't completely rule it out from happening.  I have noticed in the past, people having well made AAA lights like the fenix LD01 come apart, despite having good threads and o-rings.  Generally for keychain flashlights, I recommend adding a small swivel to minimise the chances accidental twisting.  I haven't had my own streamlight nano come apart, but in general there do seem to be more complaints of the streamlight nano untwisting apart when compared to the egear pico lite.

I do notice in the design of the egear pico zipper lite, the head of the of the flashlight is partially recessed into the battery tube.  There is about 3mm of the head available for turning the light on and off.  This leaves less area exposed to accidental twisting forces.  This maybe one of the reasons why there are less reports of the pico lite untwisting apart.

Only the knurled section of the head is exposed, the rest of it is recessed into the body

 Being so small, both of these keychain/zipper flashlights are harder to operate one handed.  The streamlight nano has a longer head to twist with, but a smaller body which is harder to grip.  The egear zipper lite is the opposite, it has a smaller head but a longer body which is easier to grip.  The egear pico lite has knurling on the head, which does make it easier to twist the head.  Between the two flashlights, I find the pico lite slightly easier to use one-handed, YMMV.

Streamlight nano, Egear pico zipper lite
[the wider longer body makes the pico lite easier to operate one handed, knurling adds grip when twisting the head]
I find there is less 'thread play' in the egear pico lite compared to the streamlight nano.  More pronounced thread play means you need to unscrew the flashlight slightly further, to ensure it is properly off.  If you do not untwist it enough, the light can still turn on if pressure is applied to the head of the flashlight.

The streamlight nano generally comes in black.  There are special blue and pink editions available, but I do not know if these will remain available permanently.  The egear pico zipper lites come in 5 colours:  blue, red, green, black and grey/titanium.

(Picture sourced from the Egear website)

I haven't paid attention to the how quickly the annodisation has worn away on the streamlight nano, as it usually on my wife's keychain.  I have not the the egear pico lite for very long, but I have noticed it has worn quite quickly.  After a month or two of mild usage there is already wear on the knurling and corners of the flashlight.


BEAM, OUTPUT AND RUNTIME


According to the specifications of these light, they are meant to produce a similar amount of output (~10 lumens).  This is in line with what we expect from a 5mm LED.


 I prefer the beam in the egear pico lite when compared to the streamlight nano.  In my sample the pico lite has less noticeable rings and artefacts in the beam.  The pink streamlight nano that I have, has a more pronounce pinky-purple tint.  The pico lite still has a purplish tint, but less so than the streamlight nano.  Keep in mind these are just individual samples, there can sometimes be variation in tint within the same flashlight line.

Beamshot of streamlight nano from ~1m

Beamshot of Egear pico zipper lite from ~1m
 
Streamlight list the runtime of the nano to be 8 hours of 'usable' output.  The egear pico zipper lite claims to have a runtime of 15 hours.  I am surprised about the amount of difference between the runtimes of these two lights.  Considering they both used 5mm LEDs, the same batteries and are direct driven... I would have expected them to be similar.  Unfortunately I do not have any spare LR41 batteries to test out the claimed runtimes (donations welcome), but here a few theories I have come up with to explain the discrepancies:

(a) Different runtime measurement techniques.  Over-estimating or under-estimating of the runtimes.  Perhaps Streamlight list the amount of 'usuable' output; after 8 hours there may still be some very very dim ouput.  Perhaps Egear measure the runtime until the flashlight has absolutely no output?
(b) The pico zipper lite has a resistor, which reduces the current to the LED... resulting in a slightly less bright flashlight, but longer runtimes?
(c) I always thought both these flashlights use the same nichia GS LED, however seeing the difference in beam characteristics, the egear pico lite may use another 5mm LED?  Perhaps this other 5mm LED may be more efficient?  But some how I doubt the efficiency would be twice that of LED in the streamlight nano.

Out of these theories, I suspect (a) to be the most likely scenario.  Manufacturers play all sorts of games to advertise longer runtimes or brighter outputs.  If you have any information on the runtime discrepancies, please leave a comment.


CONCLUSIONS

By now you'll probably figure I prefer the egear pico lite over the streamlight nano.  This is certainly the case.  Lets look at a summary of the pro's:

-easier to load the batteries
-less reports of it coming apart
-less thread play
-slightly easier to operate one handed
-nicer beam and tint (at least in my samples)
-potentially longer run-time (yet to be verified)
-available in more colours (but not pink)


 Given a choice I would prefer to buy the pico lite over the streamlight nano, and you can see why.  Price wise they are pretty comparable, looking at amazon.com they can both be bought for under $10.

Credit where it is due, I believe the streamlight nano has been around for longer.  To me, it seems as if Egear has taken the concept of the streamlight nano, and slightly redesigned it to address some of the original short-comings.

LINKS

Streamlight nano manufacturers website
Egear pico zipper lite website
Pink streamlight nano review


ADDITIONAL PHOTOS